|
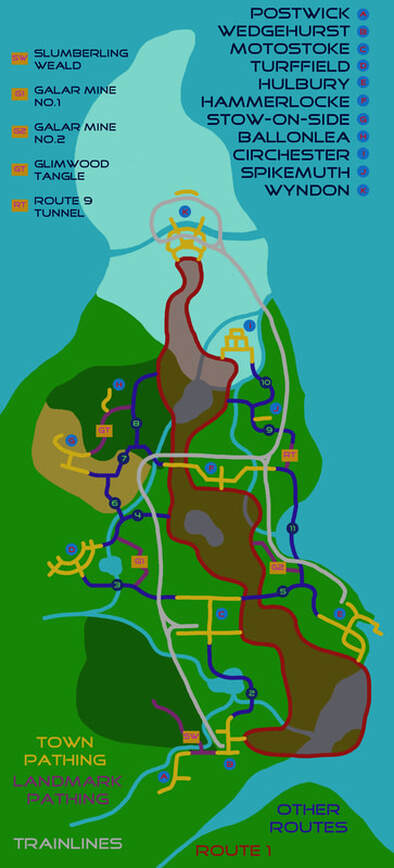
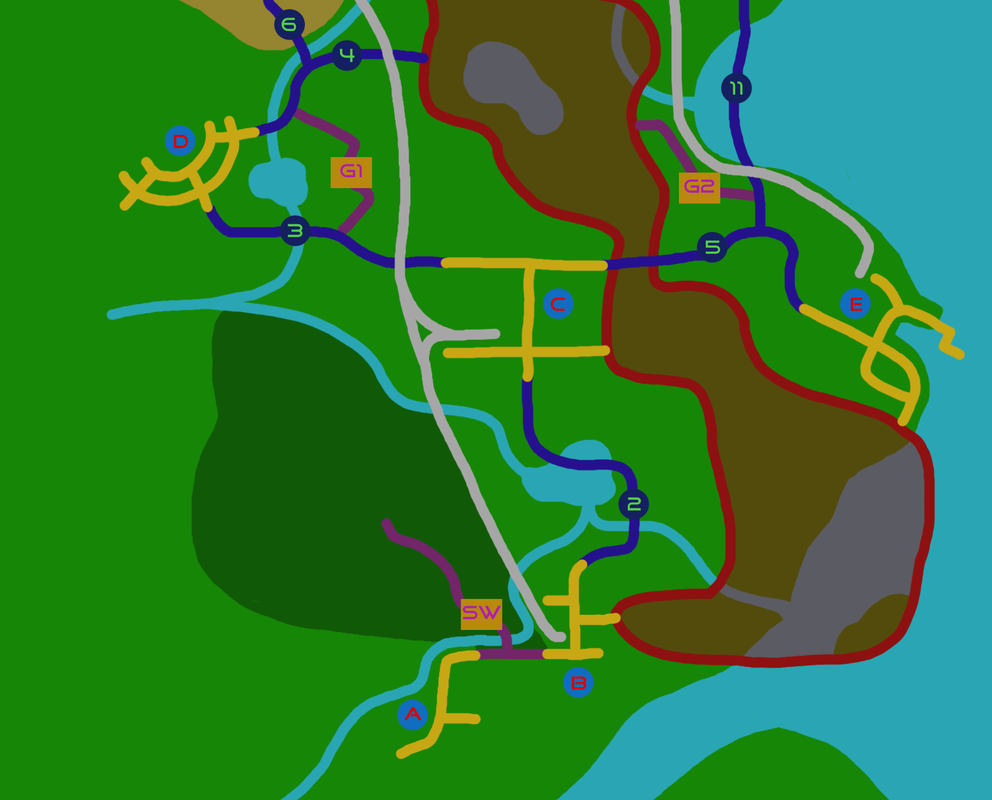
The Galar region showed a lot of promise when it was first unveiled, taking a lot of elements from the UK and mixing them into what is the most diverse region we have seen in a main game. It did deliver on that, but it also felt incredibly linear and unconnected, with certain sections of the map being cut off from access except by train. It made the whole region feel smaller than it should have been, not really helped by the Wild Area restricting design for half of the map. So what would be the best way to set about making the Galar region a better place to be? Well, top priority is getting a better way to connect everything together, and that’s where the Wild Area comes in with its new name of Route 1. You think I’m kidding, don’t you? But I’m not. Taking inspiration from the A1, the Galar Route 1 would wind its way across the region from Wedgehurst to Wyndon, providing the connecting line for everything to be built around. Now, a few rules before continuing. I’m only using exactly what was given within the game itself. No changing the number of towns or routes (though I am allowed one extra on account of Route 1 being the new Wild Area). The structure of the region will also be remaining the same, as by giving representation for all of the UK, it makes little sense to compact it down to something akin to Kanto. And just as with all maps I create, this is not to scale but serves as a guide for the explanation. With those rules out of the way, let’s take a look at that map. As you can see, everything’s colour coded and easy enough to understand. There’s some obvious changes been made to the placement of a few of the towns in relation to each other, so I’ll start with that first. And the obvious one is the starting area. Postwick is to the west of Wedgehurst instead of being south, and there is no Route to connect them. Instead, the Slumbering Weald has a path on the outside of it that connects the two, with the gate to go deeper into the forest being over the river. The pesky Wooloo will still be attacking this gate, and the beginning of the story progresses the same as the game. You’ll still be heading into the Wild Area – or Route 1, with this map – as while Route 2 is connected to Motostoke here, there’s still the lake which is impossible to cross at the beginning of the game. You can see Hulbury has moved from a north-east position from Motostoke to being near enough directly east. The idea behind it was breaking the obvious loop that the three towns of Motostoke, Turffield, and Hulbury made. There’re also more connections added, but we’ll get to those later. Stow-on-Side has been moved down to be directly west of Hammerlocke, even if it’s not a simple straight line to get to it. That also moves the position of Ballonlea, though here it isn’t placed directly north. Spikemuth and Circhester get shifted to be north of Hammerlocke, which removes that obvious loop from the map. This area is the most changed of the lot, with plenty of connections between locations that previously weren’t available. Then there’s Wyndon, which is now connected to Route 1 instead of having a Route 10 to the south of it that itself is only connected by train. The train connections still exist, but are now purely optional instead of being forced in two particular cases. And speaking of optional, there’s choice in how you get around the middle section of the map instead of being restricted to following one path. Sure, the journey as it exists in the game is still a thing, with Turffield, Hulbury, Motostoke, Stow-on-Side, Ballonlea, Circhester, Spikemuth, and Hammerlocke being followed for the Gym challenge in that order, but there’s choice in how you get between them. The obvious way is to follow the Route numbering, but that doesn’t mean you have to if you don’t want to. Take travel between Turffield and Hulbury, for example.
You could head along Route 4 to get onto Route 1 and into Galar Mine 2 to get to Route 5, but there’s also the option of heading back along Route 3 (which will now be fully open, since it had to be closed to force you into Galar Mine 1 before the badge) and into Motostoke. From there you can choose to go onto Route 5, or out to Route 1 and approach that way. Even in the late game, you can head directly into Circhester, or head for Route 9 and transition to Route 10. As for the Routes, Route 2 is still the same green hill as before. Route 3’s east side keeps the look it has in the game, with the west side taking on the appearance of the game’s Route 4. This version of Route 4 adapts the game’s Route 5, or that section that isn’t just bridge. Route 5 in this version has a bridge, though not as long, then slopes downward to the sea in a winding path. Route 6, once you get over the river, is desert and rocky terrain, as is the short bit of Route 7 that leads into Stow-on-Side. The larger changes come with these next Routes, with the rest of Route 7 being a mountain path down to a forest that leads to Hammerlocke. This forest is also represented by Route 8, though isn’t as colourful as the Glimwood Tangle. Route 9 (from the Route 1 access) would have some fields visible with the river, which would turn into a thick lining of trees upon approaching Route 10. Those trees would continue as the Route heads south, with the west side having some steeper hills on it. As the Route heads east again, there’d be rolling hills all the way down to the sea. Route 10 would be mostly similar to how Route 8 appears in the game, with ruins and sandy terrain. Since there is no water around this area, Route 11 – which connects Hammerlocke to Hulbury – has been added to provide a water Route for the game. The land nearest Hulbury will be a construction zone, with a bit of world building saying that another small town is being built. The land nearest Hammerlocke will be a beach with a sloping path leading up to the city and the Route 9 Tunnel. The largest change is Route 1, what with it now filling the Wild Area’s purpose. It will still feel the same, with varied terrain on offer throughout, with the very north of it being an icy mountain just as Route 10 is within the game. All the areas represented in the Wild Area are within Route 1, with that small island within the southern part being representative of the Lake of Outrage. As stated, the idea behind the creation of this map was to bring more connectivity to the region and have it feel less linear in design. Do you think I have achieved that here, or do you think I’ve gone overboard with the idea? Let me know down below.
0 Comments
Leave a Reply. |
Categories
All
|


 RSS Feed